Led strip lights have gained increasing popularity due to their versatility and various applications in both domestic and commercial environments. These adhesive-backed lights are flexible and can be used for tasks like accent lighting, task lighting, or even as primary light sources in artistic works. One of the main advantages of these strip lights is that they allow for customization since they can be easily cut into different lengths to fit any space perfectly, thereby improving the look and functionality of any place. It is essential to know where LED light strips should be cut so as not to damage electronic components inside, thus ensuring maximum efficiency.
Understanding LED Strip Lights
A long piece of circuit board with surface-mounted LEDs (Light Emitting Diodes), among other elements, is covered by a flexible material that protects its contents and makes up LED strip lights. These types include single-color, dual-color, and RGB (Red, Green, Blue) LED strips, which vary in color and create dynamic effects such as color fading or chasing through the use of controller units. Additionally, there are RGBW strips containing an additional white LED for more nuanced lighting options.
These versatile lighting solutions can be used in a myriad of settings. They are commonly used in kitchens as under-cabinet lighting as well as behind TVs or monitors to provide ambient lighting; living rooms have accent lights, while outdoors, weather-resistant strips may be used. In addition to this, LED strip lights enhance retail displays, illuminate architectural features, and also provide energy-efficient alternatives at events or exhibitions.
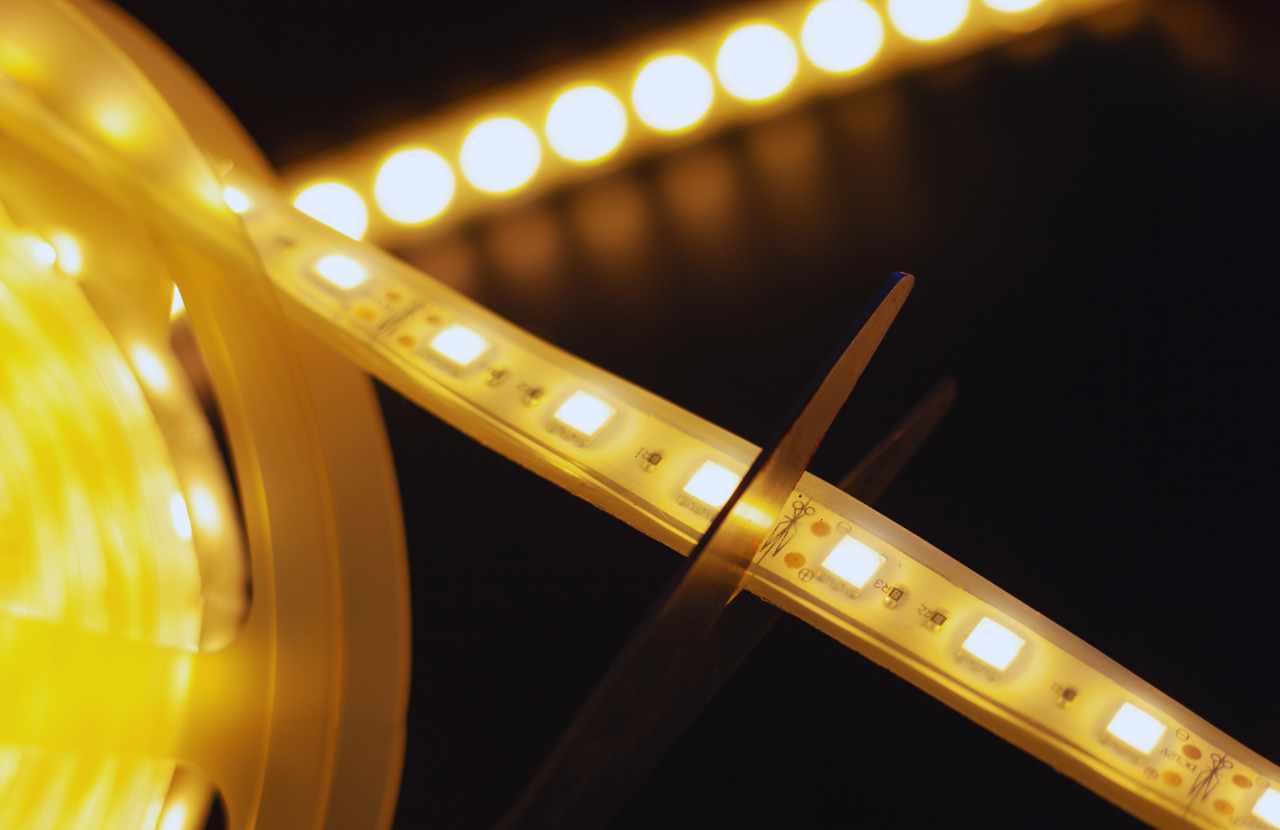
The accurate cutting of LED strip lights is important for their proper operation and longevity. Each strip has marked cutting points, usually situated between designated sets of LEDs. These points are positioned strategically so that they keep the continuity of the circuit intact without damaging any electrical components therein. Cutting the LED strip at some other point disrupts the electric flow, which leads to malfunctioning in case all these loads fail, causing the entire system to collapse. Henceforth, noncompliance with these marks results in a smooth installation process during which you can achieve the best performance that will also extend the lifetime of light strips.
Tools Needed for Cutting LED Strip Lights
To get smooth and accurate cuts, make sure you have the following essential tools:
Sharp Scissors: These are used to make clean and precise cuts within the marked cut points on the LED strip.
Utility Knife: It is helpful when there is a need to make exact cuts and adjustments.
Measuring Tape: This helps in marking out the specific length required before any cuts are made so as not to miscalculate.
Optional Soldering Iron: When joining back broken led strips or making new wiring connections.
Step-by-Step Guide to Cutting LED Strip Lights
Cutting LED strip lights might appear difficult at first; however, it can be a simple task once you have right tools and clear instructions. Make your lighting projects more professional with these steps that guarantee accuracy and functionality of your cuts.
Step 1: Preparation
Power Off the LED Strip: The first step is always to turn off any power supply before adjusting any component including the strip lights. This precaution prevents electrical accidents or damage to LEDs and circuits thus protects both people’s lives as well as equipment from harm.
Measure the Required Length: A measuring tape should be used in order to measure carefully what length of an led strip that one needs. Accurate measurement is critical here since even small errors could result into wastage of materials.
Mark the Length: After you have measured, use a pen or marker to clearly mark where you want to make cuts on the LED strip; these marks will help guide your actions so that they remain precise.
Step 2: Locating the Cut Points
Identify the Copper Pads: On the LED strip, closely look for copper pads or marks indicating safe cutting points; typically, these are shown through dotted lines or scissors icons.
Verify the Cut Points: Confirm that these are indeed the cut points by rechecking them. What this means is that if an individual does not cut along those markings, it can interfere with the passage of electricity, hence leading to the failure of the LED strip.
Step 3: Making the Cut
Align Scissors or Utility Knife: Position sharp scissors or utility knife directly over the marked cut point. Make sure you line up with copper pads for accuracy when cutting.
Cut Cleanly and Straight: Along a drawn line that separates LED strips make a neat and straight incision. For an unbroken electrical circuit it is essential making a clean cut here.
Inspect Cut End: Check the new end of the led strip after cutting to ensure no damage has been done to any LEDs or other circuit components during this process.
Optional Soldering: If the LED strip needs to be rejoined or new wiring connections are required, use a soldering iron to carefully make the necessary reconnections. This step might be essential for achieving the desired lighting configuration, especially in complex installations.
The above steps will help you achieve precision when cutting and installing LED strip lights for optimal performance and longevity. By appropriately handling and cutting your light fixtures, they become both functional and visually appealing.
Common Mistakes to Avoid
There are several common mistakes people make that can cause LED strip lights not to function properly or last long enough. Here are some of them:
Cutting Outside Designated Cut Points: As already noted, one major issue is cutting an LED strip outside the marked cut zones. This can break the electrical circuit, leading to malfunction or full-fledged failure of the lights. It is important always to make cuts precisely at the indicated points, usually indicated by copper pads or scissor icons.
Using Dull Tools: Blunt scissors and utility knives may leave rough edges or wavy lines that could harm components inside an LED strip. Use sharp tools that will produce clean, accurate cuts that do not damage the integrity of your LED strip.
Not Securing Ends Properly After Cutting: Failure to secure cut ends exposes strips to elements in nature, which may corrode them over time or eventually loosen connections. Cap or seal the ends properly so as to maintain stability and protect your strip.
By avoiding these common errors, you can significantly enhance the installation process and performance of your LED strip lights. With this in mind, proper techniques will ensure you have reliable lighting effects with precision.
Connecting and Installing Cut LED ribbons
After cutting the LED strips to the desired lengths, accurately joining the pieces ensures the unbroken flow of electricity and optimum performance. You could connect cut parts using connectors or soldering. Here are detailed steps for both:
Method 1: Using Connectors
Choose the Right Connector: Get a connector that is compatible with your type of led strip (single color, RGB etc). See to it that it matches the width and number of pins on your led tape.
Prepare Ends: Snip any unwanted silicone coating or covering at cut ends of your led strip so that copper pads are fully exposed.
Insert the Strip into Connector: Open up the connector clip, line up copper pads on this led strip with metal contacts in connector then push it inside firmly. Assure yourself that it fits tightly and sits completely within connector.
Secure the Connector: Close down the connector clip to hold down this ribbon. Check whether you connected well such that even if you move around no disconnection will happen.
Method 2: Soldering
Prep Strips: Just like when using connectors, trim off unnecessary materials to expose the copper pads at the cut ends for the led strip.
Tin Copper Pads: Apply a small amount of solder onto exposed copper pads at both ends of strips by means of soldering iron. This process, called tinning, prepares pads for better solder connection.
Join Strips: Align tinned pads from two distinct LED strips and melt solder across them using a soldering iron thus creating bridge between these pads which in turn results into stable electrical connection.
Solder Inspection Once the solder has cooled off, you can check how strong its connection is without gaps or overlaps causing short circuits between them.
Where to Cut LED Light Strips?
When it comes to cutting LED light strips, it’s essential to know where and how to make precise cuts to ensure proper functionality. LED strips are typically marked with designated cutting points, usually indicated through a pair of copper pads or a scissor icon printed on the strip. These marks show exactly where you can safely cut without affecting the performance of the remaining sections of the strip. Using sharp scissors or a craft knife, carefully cut along these lines to maintain the electrical circuit’s integrity. Always ensure the strip is powered off before making any cuts to avoid any risk of injury or damage.
Tips for Securing LED Ribbons on Various Surfaces
Once LED tape has been cut and joined together, keeping them fastened securely onto different surfaces becomes important because they contribute much towards stability as well as functionality. Here are some guidelines:
Clean the Surface: Make sure you clean, dry, and, if possible, dust or grease-free surface before attaching LED strips to it. This enhances adhesion.
Use Adhesive Backing: Majority of LED tapes come with self-adhesive backing. Simply peel off the protective layer and then press the tape onto a prepared surface very firmly.
Reinforce with Mounting Clips: Mounting clips can be used for additional security, especially in areas where adhesive may weaken over time, like high humidity areas. These clips can be screwed or nailed into place, holding the strip securely.
Ensure Proper Alignment: Place your LED ribbons carefully along your intended route taking extra care when working with long straight runs using either a straight edge or chalk line so as to keep them well positioned even while they are being lit up uniformly.
Avoid Excess Bends: Although LED strips are flexible, they should not be bent excessively or twisted because this could damage the circuits. Observe manufacturer’s advised bend radii to avoid interfering with performance of ribbon.
Test Functionality: After installing led tape ensure that all connections are functioning properly by turning it on. In case any segment does not light up, go through your connections again and ensure that there is no loose wire or broken connector .
If you follow these steps and hints, you will be able to confidently connect and set up your LED strips so that they work perfectly and provide a beautifully even lighting scheme for your space.
Testing and Troubleshooting
After Cutting Test of LED Strips: It is important to test the LED strip light after cutting it so that you can make sure it functions properly before finalizing the installation. Here are the testing steps for an LED strip:
Check Power Supply: Make sure your power supply matches with both voltage and current requirements of the strip. A wrong power supply may prevent full lights on the strips.
Power Connection: Fixing the led strip to a power source is required here. Ensure that connection to be tight if connectors were used. If joints were soldered, take note that solders ought to appear clean as well as strong.
Switch On: Let there be electric power in the LED tape lightings. You can now go ahead observing if all units are illuminating in good order along entire length of this particular tape.
Inspection at Connections: Focus closely on links where this piece was sliced off then fastened together; no blinking or poor lit segments should be seen because this is an indication of weak linkages.
Use a Multimeter: Turn on one section of LEDs! If any section doesn’t light up, use a multimeter to check for continuity across the connections as well as correct voltage read across them. This device could help locate circuit breaks or insufficient voltage.
Trouble Shooting Common Problems
Here are some troubleshooting tips for your cut LED strips if things do not go well:
Non-Functioning Sections: Validate Cut Points: Ensure that cuts have been done accurately using precise points mostly denoted by copper pads or scissor signs; incorrect slices might disturb the complete circuitry inside the tube.
Examine Links: Confirm whether connectors do match up properly with copper pads but joint areas must also be tested whether there exists cold solders or gaps in any way.
Use a Multimeter: Test for continuity across this section, which is not functioning; if there is no continuity, it means that the circuit is open; hence, reconnection is necessary.
Flashing Lights: Check Power Supply: Inadequate power supply may result in such flashing. Check the available voltage and current in your LED strip for the entire length of it.
Inspect Links: Any loose or simply cheap connections may cause flickering to take place; therefore, you should also redo connections and solder these joints again.
Dim Sections
Voltage Drop: There might be low light at far corners of an led strip because when it has been installed near the source, this affects its brightness due to voltage drop. Use a thicker wire or add more power supplies periodically to solve this issue.
Review Visible Damage: Scan through and see whether there are any visible damages on that tape e.g. nicks and cuts which could affect its performance.
Hot Spots/Overheating
Ventilation Check: It’s important to ensure that LED strips have adequate space for ventilation. Overcrowded or closed systems do not allow heat dissipation to occur easily as required.
Evaluate Power Supply Compatibility: Over-specification and under-specification will lead to overheating conditions. Ensure proper power requirements for your LED strips.
Through testing and troubleshooting your cut LED strips systematically leads to continuous operation as well as maximum illumination within your premises space.
Final Words
This is the crucial importance of good cutting methods that will ensure performance and durability of your LED strips. The circuit integrity is upheld by accurate cuts at these prescribed places, which prevent interruption leading to non-functional or dim parts. Moreover, snug connection points through any connectors or soldering eliminates flickering and faulty lighting.
The flexibility of LED strips enables them to be used in customizable lighting solutions which are outstanding. They can be cut to size for the perfect fit in a range of applications, such as under cabinet lighting, showcasing architectural characteristics, or bringing out the finer details of model displays and signs. This adaptability enables users to create bespoke light designs that suit their tastes, enhancing the beauty and functionality of their spaces. Your custom light effects can bring brilliance and uniformity into any space through well-planned deployments involving LED luminaries.
FAQs
Here are some FAQs about cutting LED strip lights that you searched mostly:
Are LED strip lights able to be cut anywhere?
No you can only cut led strip lights specifically on declared cutting points marked with lines, dots or scissor image. Cutting other sections destroy the line making it malfunction.
What tools do I need to cut LED strip lights?
A sharp pair of scissors or utility knife will guarantee a clean, straight cut. Make sure that your tools are proper enough not to damage the strips because they are sharp.
How do you put back together trimmed led strip lights?
Soldering as well as diverse connectors like T-connectors and L-connectors is employed when joining cut LEDs together again. Secure all connections properly ensuring correct polarity so that no issues arise.
What should I do if my LED strip lights don’t work after cutting?
If these lamps fail to light up after trimming then check power source, ensure tight connections as well as right polarity. If problems persist most likely it was incorrectly done hence technical assistance may become necessary.
How long can you leave LED strip lights on?
LED Strip lights can stay on for long hours, provided they do not overheat. However, one should take note of the temperature that the strips attain when used continuously and ensure that they are not too hot to touch, as high temperatures reduce their lifespan.
Can all types of LED strip lights be cut?
Not all led strip lights are capable of being cut. For instance, those with individual IC chips often cannot be resized. You must always refer to product specifications and manufacturer’s instructions before cutting LED strip lights.
